My Culinary Adventure

My first tournaged (cut into 7 sides) carrots

Ever since I started my blogs on Korean and other ethnic foods, I found myself often wondering if there were more appropriate cooking or preparation terms I could use to describe my cooking process. I also realized that I wanted to gain a better understanding and build a solid foundation of cooking whatever cuisine it may be. From last September to March of this year, I have attended the Culinary Techniques class at our local French Culinary Institute. It is a 110 hr course that was once a week from 10am to 3pm. Totaling 22 lessons in all.

As I shared some of my experiences with my friends, they have suggested that I should blog about my experiences of taking the Culinary Techniques class at the FCI and also share any tips that I got from the instructors there (which are not normally in any cookbook). So, please let me digress here a bit for the next several weeks while I blog about cooking classes.

I really wish I had started blogging about this earlier as my memory is now a bit foggy…sigh… but as they always say “better late than never”.

NOTE – I know there are probably many sources online about all the usual stuff you learn at cooking schools. I don’t plan to go over those but actually focus more on little tid bits of info, tips that I found very helpful and useful in everyday cooking.

Lesson 1

First thing we did was to pick up our chef jacket, pants, hat, apron, neckerchief, side towel and a tool bag that had just about every tool you would need to cook (paring, boning, slicing knives, whisk, spatula, etc). Ever wonder what was in the bags that the Master Chefs always bring with them on TV shows? Well, I have one now. Basically all your kitchen tools in a bag.

The first class was all about learning safety – about storing/handling food and equipment. I also learned that sharpening the knife with the sharpening steel before every use really makes cutting job very easy and actually safer. But of course, I did end up cutting my finger slightly NOT cutting but while washing my knife at the end! It figures…. Anyway, don’t let your sharpening steel just lie around, use it!

Then onto cutting vegetables – we learned all the different ways of cutting (taillage) : jardinier, macedoine, julienne, brunoise, paysanne, chiffonade, concasse, etc. Good thing I learned some French in high school. yikes!

Turned and cooked vegetables - plated by the students
Turned and cooked vegetables – plated by the students

So, in a nutshell, here’s what I found interesting –

  • sharpen your knife before each use (or at least every 2-3 use) w/ sharpening steel
  • cut vegetables into uniform sizes and shape to ensure even cooking (also looks nice)
  • for easy mincing(hacher) of herbs, make sure the herbs are well dried after they are washed
  • when storing meats (esp. chicken) in the fridge, keep them on lower shelves because if any of the juice leaks, it will contaminate less things and also because usually the lower shelves are colder
  • ever wonder why chef’s wear the neckerchief around their necks? First to absorb any perspiration but more importantly to keep chefs warm when they enter those walk-in freezers!
  • cooking a l’anglaise (English style) basically refers to a very bland, plain method of cooking – just boil in salted water.
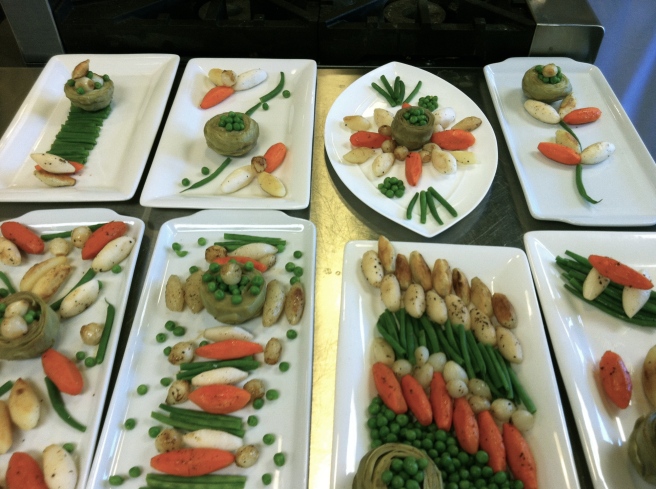
  • cutting the carrots into tournage (see pic) was incredibly hard – 7 sides? whoever came up with this? why can’t it be 8 or 6? so much easier to divide. but basically it’s so that the vegetables will roll around on the pan as you shake the pan, getting cooked evenly.
  • finally figured out how to chop the onions like the chefs on TV (where you first slice it into strips and then perpendicularly while the onion is still keeping it’s shape). No one told me NOT to completely cut off the root end and also that the knife has to be really sharp. I don’t think I have seen one TV show where they tell you that!! All this time, my onions would always fall apart whenever I tried to chop like the chefs..

Hope you find some of this useful!

Gluten Free Meyer Lemon Almond Cookies

Meyer Lemon Almond Cookies
Gluten Free Meyer Lemon Almond Cookies

While I was shopping for Christmas gifts at William Sonoma, I discovered a bag of gluten free flour. It said that you can use it as a flour substitute – cup for cup. Hence the name: Cup4Cup (C4C) gluten free flour. It was not cheap, but I had to buy it and try it for myself. I also went on their site to look for recipes and saw that they were having a Holiday Cookie contest. Since I was going to bake some cookies for Christmas anyway, I thought ‘why not?’.  And so that’s how I came to enter the contest and actually became one of the two runners up!

In case any of you are interested, here’s the recipe that I submitted. It has been tested and approved by chef Lena Kwak (co-founder of French Laundry’s Cup4Cup )!

Makes about 36 cookies

Cookies:
1 1/2 cup C4C gluten free flour
1/2 cup almond meal (finely ground almonds w/ skin)
1 1/2 sticks unsalted butter, room temperature
1 cup + 3 T sugar (3 T sugar for dipping)
1/4 tsp kosher salt
3 T freshly grated meyer lemon zest
1/2 tsp vanilla extract
1 egg

Icing:
1 1/4 cups powdered sugar
2 T fresh meyer lemon juice

If you can’t buy any almond meal(I used Trader Joe’s), just make your own – finely chop almonds in your food processor.

Mix together the butter and 1 cup of the sugar until creamy. Beat in the egg and vanilla extract. Gradually mix in the lemon zest and the almond meal. Then slowly add in the C4C flour, a little at a time, beat the dough until it is combined well, and chill it, covered for 2 hours.

Put the 3 T of sugar in a small plate. Take the chilled dough and form the dough into walnut-size balls and arrange them 2 inches apart on baking sheets lined with parchment paper. Moisten the bottom of a glass with water and dip it in the plate with sugar to coat the bottom with sugar. Flatten the cookie balls to about 2 in in diameter with the bottom of this glass. Repeat before each cookie.

Bake the cookies in the middle rack of a preheated 350°F. oven for 12 – 13 minutes, or until they are golden around the edges, transfer them to racks, and let them cool.

Lemon Almond Cookies right out of the oven
GF Lemon Almond Cookies right out of the oven

Make the icing by whisking the sugar and the lemon juice in a small bowl. Drizzle or spread the icing over the cookies. Decorate with luster pearls or other colored sugars.

GF Lemon Cookies sprinkled with peppermint sugar
Iced and Decorated GF Lemon Almond Cookies

* If using regular lemon, you may want to reduce the amount of zest to 2 T.
* Using the almond meal give this cookie more texture and body.

Thank you C4C for making this gluten free flour available! I can’t wait to make more stuff with this.

Shabu Shabu – Korean style

Korean Style Shabu Shabu

Shabu Shabu is a very popular Japanese dish in Korea. The recipe listed here is a Korean version – which means rice, garlic and chili pepper are involved. 🙂 Similar to how I came to develop my own recipe for Yache Twigim (because no restaurant served this dish),  I developed this recipe over the years because I have not yet found any restaurants in my area that serves this dish the way I like it.

The best Shabu Shabu I ever had was in a pheasant farm in Cheju island many years ago. It was made from pheasant stock and paper thin slices of pheasant meat.  It was just unbelievably tender and delicious. I haven’t had anything similar ever since but this beef shabu shabu is a good substitute.

This dish is one of my family favorite and I love it because it is really easy to prepare and cook. It is also very nutritious and very diet friendly. Can’t get any better than that…

So here’s what you need for 4 people:

It works best if you have an electric hot pot (cooker) like the one below.  Besides the rice cooker, this is probably the best electric appliance to have for cooking asian dishes. When you buy an electric hot pot, make sure it can reach high temperatures (above 450 degrees) which means it will boil quicker. If you don’t have a cooker, you can just cook it in a pot on the stove and eat as you cook.

electric hot pot for shabu shabu
  • 1 lb prime rib eye, paper thin sliced for shabu shabu
  • 1 onion
  • 1 large carrot or 2 small carrots
  • 1 bunch spinach (oriental is good)
  • 1 small napa cabbage
  • 1 bunch green onions
  • 1 bag of enoki mushrooms (or 5-6 large shitake mushrooms)
  • 1 7 or 8 oz bag of yam noodle
sliced rib eye for shabu shabu

Luckily, we have a Japanese grocery store nearby and this is how they sell the shabu shabu meat. It is paper thin and has very nice marbling to the meat. Hopefully you can get beef of this quality in your neighborhood. The important thing is to have the meat sliced really really thin (it almost tears apart when you pick it up) and then to select meat that has good marbling. Otherwise, the meat will taste too chewy and tough when cooked.

yam noodles
yam noodles

Here are two different kinds of yam noodles. They both work fine. Their taste is really not any different – there’s actually not a lot of taste to these noodles. The noodles are eaten more for texture and they are zero calories! Can’t beat that!! These noodles work great in soups because it does not thicken the soup at all and their texture remains chewy (al dente) no matter how long they are cooked.

For the soup stock-

  • 7-8 C anchovy stock with sea kelp
  • 2 T Memmi (Kikkoman Noodle Soup Base)
  • 1 T sea salt
  • 1 T Soy sauce (optional)

For the jook (porridge) –

  • 2 C cooked rice

    Sauces for shabu shabu (Memmi, Kon Shabu, Pon Shabu)
    Sauces (Memmi, Kon Shabu, Pon Shabu)
  • 1 – 2 T chopped garlic
  • 1/4 tsp garlic powder
  • 1/8 tsp red chili powder (optional)
  • 1 – 2 T pon shabu sauce
  • 2 tsp roasted sesame seeds
  • dash of ground black pepper
  • thinly sliced perilla leaves as garnish
  • salt to taste

Dipping sauces for shabu shabu (by Mizkan) –

  • Goma Shabu – this is a sesame + soy sauce + vinegar + sugar sauce.
  • Pon Shabu – this is a ponzu (citrus) + soy sauce + vinegar + dashi sauce.

1. Prepare the soup stock by first making the anchovy stock on the stove.  Add a piece of sea kelp (다시마 Dashima) at the end and simmer for 5 more minutes.  If you leave the sea kelp in the stock too long, a milky sappy stuff  starts to come out  from the kelp. This doesn’t really affect the taste but it makes the soup cloudy.

making anchovy + sea kelp stock

Season the soup lightly with some salt, soy sauce and Memmi. Taste the soup and adjust accordingly.

Strain the anchovies and the sea kelp and add the stock back into the pot and keep it warm.

2. Clean the vegetables and cut them. Here are some quick pics on how to cut a napa cabbage.

cut the root end of the napa cabbage
cut the root end of the napa cabbage first then the leaves will unravel..
stack the leaves and cut into pieces
stack the leaves and cut into pieces like so..

Slice the onions thinly. Cut the green onions into 1 1/2 inch lengths. Slice the carrots into thin slices so that they cook faster. Clean the spinach and cut off the roots. If you can, buy oriental spinach because it doesn’t get as mushy as the common spinach when cooked. Oriental spinach/Japanese spinach/Korean spinach is usually smaller, have longer stems and have pointier and flatter leaves. Rinse and cut off the roots of the enoki mushrooms. You can substitute fresh shitake or oyster mushrooms or use dried reconstituted shitake mushrooms instead of enoki.

vegetables for shabu shabu

Put all the cut vegetables onto a large platter so that they are easy to reach when cooking at the table.  The spinach and cabbage reduce a lot in volume when cooked so you should have more cabbage and spinach prepared than what you see in this picture.

3. You are now ready to cook and eat. Hopefully the table setting is done by now…you should have a small soup bowl and sauce dishes for each place setting. Transfer the warm soup into the hot pot. Turn the heat on high and when the soup is boiling, take off the lid and cook the meat first. Add about 2-3 pieces of meat for each person. Because the meat is so thin, it cooks almost instantly, so be prepared to take it out when the meat is no longer pink.  Serve the meat into the bowls and let everyone dip the meat into one of the 2 sauces (pon or goma shabu) and eat them.  Reserve about 1/3 of the beef so you can cook it with the vegetables.

beef shabu shabu cooking in hot pot

4.  It is now time to cook the vegetables with the meat. Don’t put all of the vegetables into the hot pot at once. Divide the vegetables into 2 or 3 parts and cook them in 2 or 3 batches. Otherwise, they will take too long to cook and people won’t be happy.  Add a few pieces of the meat, and some of the carrots and onions first since they take longer to cook. Cover the pot and let it come back to a boil. Add a handful of spinach, cabbage, yam noodles and cover and bring back to a boil. Finally, add the green onions and mushrooms.

cooking vegetables for shabu shabu

When the vegetables all become soft then they are ready to eat! Turn down the heat to low when everything is cooked to keep things warm. Serve the vegetables and the meat but not much of the soup because it will be used later to make the porridge. Turn the heat back up to high to cook your next batch of vegetables and meat – repeat step 4.

5. After everyone has had a good share of all the vegetables and the meat, (it’s good to have some leftover meat and veggies in the soup) you can begin to make the jook (porridge).

To the soup, add some cooked rice and bring it to a boil.  Make sure you have the right amount of soup for the rice – the rice should be fully immersed in the soup with some soup leftover. But if the rice is too freely swimming in the water, you may want to take some of the soup out. You can always add more back in.

Once the rice starts to bubble, season the porridge by adding the chopped garlic, black pepper, chili powder, pon shabu sauce and the salt. Add less,  taste and then add more.

If you have fresh perilla leaves, you can slice some of them and add to the porridge right before you eat.

shabu shabu jook
shabu shabu jook

So what are these brownish seeds that you see on top of the jook? They are the seeds of the perilla plant – a cousin of the white sesame seeds that you commonly see. They are very fragrant and flavorful and I love how it adds a little extra punch to the jook.

Well, that’s how you can make shabu shabu at home, Korean style. It is delicious, wholesome, pretty diet friendly (except for the beef), full of vitamins, gluten free and quite easy to cook. Most of all, it is something that you can really enjoy cooking and eating together with your family or friends.

Variations

– substitute noodles for the rice. Use fresh kalguksu or udon noodles.  Seasoning is similar to the one used for the rice.

Jangjorim and fried egg over rice

Jangjorim Egg Bap
Jangjorim Egg Bap

When you work at home,  there are times when you really don’t want to cook or make anything. Sandwiches are great quick lunches but unfortunately I’m sensitive to gluten. But I don’t want to really cook anything for lunch.. So I have found ways to make a meal out of things I have in the house without spending too much time. Salads are always a good option but it gets boring after a while…

So here’s a very quick, easy way to make a tasty healthy meal for all those busy, lazy, ‘don’t feel like cooking’ people who may also be gluten sensitive. 🙂

Ingredients

  • A bowl of cooked rice – the rice I used here is mixed grain (wild, black, brown) rice and barley. You can also add beans (kidney, black, garbanzo.. etc) to add more protein and reduce your carb intake
  • 1 egg
  • 1 1/2 tsp jangjorim sauce per each 1 C of rice
  • 1/2 tsp sesame oil
  • sprinkling of roasted sesame seeds
  • OPTIONAL
    • some jangjorim meat and/or peppers
    • sprinkling of CJ babirang
    • crumpled roasted sea weed

1. Hopefully you have cooked rice in your rice cooker or leftover rice in your fridge.  If not, hatban (햇반) is your best friend…If you don’t know what hatban is, you are definitely missing out. At most oriental markets, you can buy these already cooked instant rice that comes in plastic bowls and all you have to do is to reheat in the microwave for 1-2 min. CJ, Ottogi are all the same. Heat up some rice (or room temperature rice is good too) and put it into a bowl.

CJ Brown Rice Hatban (instant rice)

2. Fry one egg. Over easy tastes the best but if you don’t like runny eggs, you can cook it all the way.

3. Add the egg on top of the rice, add the sauce and other seasonings and mix everything together. And there you have it!! My mouth is watering just thinking about it…

You might say “HELP! I have no jangjorim!” – In that case, just use regular soy sauce instead of the jangjorim sauce.  Remember to use smaller amount of soy sauce since it’s saltier than the jangjorim sauce. I have it with just soy sauce all the time and it’s really good too. You may like this better if you don’t like the sweet taste of the jangjorim sauce. Here’s to healthy lunches!!

Sauteed string potatoes with mayo (Korean potato side dish)

Sauteed potatoes with mayonnaise
Sauteed potatoes (kamja bokkeum 감자볶음) with mayonnaise

Kamja bokkeum (감자볶음) is a very simple side dish that’s real easy to make and goes really well with other spicy Korean foods. It also is a great side dish for Korean lunch boxes (도시락반찬 doshirak banchan). In fact it was my ultimate favorite side dish to have in my doshirak(lunchbox) when I was growing up.  Rice, roasted seaweed, spam or sausage, picked cucumbers(오이지 oeeji) and this potato dish really made my lunch time the happiest time of the day.

Ingredients

  • 2 – 3 potatoes (white or russet or any other)
  • 2-3 T canola or olive oil
  • 1 tsp – 1 1/2 tsp of salt
  • black pepper
  • 1 T or more Mayonnaise

1. Choose good quality potatoes that are firm and smooth. Less starchy potatoes like white potatoes work well and is also easier because you don’t have to peel the skin. If you are using russet potatoes, you definitely need to peel the skin first. Wash the potatoes and julienne them. Best is to cut a bit thinner than the thickness of shoe string fries but it’s OK if it’s a little bit thicker – it will just take longer to cook.

white potatoes julienned

2. Soak the cut potatoes in cold water for few minutes to let the starch seep out. If you skip this step, the potato pieces will start to stick to each other (kind of like hash browns) when you saute them. Not the end of the world if they bunch up but..

potatoes soaking in water

3. Drain the potatoes. Get a paper towel and just randomly grab few potato pieces at a time with the towel to soak up any extra water. The less water there is, the less splatter you will get when the potato goes into the pan so just think about that!

potatoes drained
potatoes drained

4. Heat 2-3 T of oil (depending on how much potato you have) in a frying pan on medium high heat for 2-3 minutes until the oil gets heated (watery consistency). Start with 2 T and you can always add a little more if the potatoes look too dry. Once the oil is heated, add the potatoes to the pan. Stir the potatoes to make sure all the pieces are evenly coated with oil.

potatoes in pan
potatoes in the pan (not yet cooked)

5. Lower the heat to medium. Sprinkle salt and pepper. Best strategy is to sprinkle about 1 tsp first, mix it in  and saute for 7 minutes or so until the potatoes are fully cooked and tender. Taste the potatoes as soon as they become edible and add more salt if necessary. It should taste well seasoned but not at all salty because you will be eating them with mayonnaise. It is OK if some pieces get browned but you need to make sure they are all evenly cooked so stir them frequently.

6. There! it’s done! Plate the potatoes and add a dollop of mayonnaise on top or on the side. Mix it up when you eat or just dip the potatoes in mayo every time you eat. It really is the simplest thing to make but it adds so much more to a dinner table. Best accompaniment to spicy jjigaes including kimchi jjigae, spicy jorims, janjorims, meat dishes and grilled fish.

Enjoy!

Kamja Bokkeum(Sauteed String Potatoes)

My Sister’s Mapo Tofu

mapo tofu
mapo tofu

I know I have been kind of neglecting this blog.. Apologies for those who have been visiting. I have been visiting Korea in Feb and so my focus was shifted temporarily towards Korean cooking. But I am back now so more blogs to come…

Mapo Tofu is a Chinese dish but Koreans love it and for many, it is part of their regular home cooking menu.  The  recipe introduced here is from my sis #1 ( I have 3 sisters and they are all amazing cooks so you will be seeing many more recipes from them thru yours truly!).  Bell peppers and onions also make this a healthier recipe compared to  many others which use just meat and tofu.
This dish is  pretty quick and simple so it’s great for a party. In fact, the pictures you see here was for a party we had and it was a wonderful dinner with other Korean-Chinese favorites (pic at the bottom of the page).

Servings: 3 to 4       Prep Time: 15 min        Cooking Time:25 min

Ingredients

  • 1 pack of firm tofu.  Regular or soft fofu also works but firm is better.
  • 1 T (canola or vegetable oil)
  • 1 T finely chopped ginger
  • 2 tsp finely chopped garlic
  • 1/2 lb ground pork
  • 1 sweet onion, chopped
  • 1/3 red bell pepper, cut up in chunks (similar size of tofu pieces)
  • 1/3 green bell pepper, cut up in chunks (similar size of tofu pieces)
  • 1 tsp sesame oil
  • 1-2 green onions, chopped (about 3 T)
  • black pepper

Sauce

  • 2 T Chili Bean Sauce ( Toban Djan)
  • 2 T Hoisin Sauce

    chili bean sauce and hoisin sauce
    chili bean sauce and hoisin sauce

There are other versions that use a combination of oyster sauce and soy sauce or miso bean paste but my sister’s version uses just these two sauces and it works!!

  1. Prepare the sauce: Mix the chili bean sauce and hoisin sauce and set aside.
sauce for mapo tofu
sauce for mapo tofu

2. Cut the tofu into 3/4 in cubes and let it drain for few minutes. Make sure the tofu is well drained because this recipe does not use cornstarch to thicken the sauce and so we don’t want too much extra liquid coming from the tofu.

tofu for mapo tofu
tofu cut up and drained

3. Get a deep frying pan, a wok or a paella pan. Heat 1 T oil on medium high heat, cook the garlic and ginger until slightly browned.

garlic and ginger
garlic and ginger

4. Add the ground pork to the cooked garlic and ginger. Stir-fry pork while breaking up lumps and cooking until it is no longer pink.

cooking pork for mapo tofu
cooking ground pork

5.Add the cut onions, bell peppers and cook for few minutes more until onions are translucent and the peppers are soft.

onions and bell pepper added

6.  Stir the chili bean sauce mixture to the pan, mix all of the ingredients together and bring to a simmer.

7. Add the cut up tofu into the pan and stir.  Do not stir too much because tofu will break or get mushed into pieces. Sprinkle black pepper to taste.

simmering mapo tofu
simmering mapo tofu

8. Simmer for 10 minutes. Turn off heat and sprinkle sesame oil and chopped green onions on top. Serve with cooked white rice.

Here’s a picture of our Korean Chinese night at my sister’s house!

Mapo Tofu, Pork and Chive stir fry, Seafood Medley

Pan-fried Salmon, Caper Salad & Rice w/ Teriyaki Mushrooms

pan-fried salmon, caper salad and teriyaki mushrooms over rice


This is one of my daughter’s favorite dinners.  In my opinion, eating a delicious meal has a lot to do with the combination of dishes you eat together. And this combination of a great savory salmon with a tangy, sweet & spicy caper salad and then smoothed out by teriyaki mushrooms with rice is just amazingly good. I always believe in pairing foods that are salty with sweet,  heavy meats with fresh and tangy salads, hot spicy dishes with more mild, savory dishes.

When cooking a whole meal, a thing to keep in mind is the order of things you do to cook the 3 dishes. Cookbooks never tell you what is the best way to order things when you are cooking more than one dish. You want the warm/hot dishes to be hot and the cold dishes to be cold for foods to taste its best.

So here’s what I do:

  1. wash and cook the rice
  2. prepare the salmon (season it and let it sit)
  3. prepare the caper salad but never dress the salad until you are ready to eat. Dressing the salad too early will wilt the greens and make it all soggy.
  4. cut up mushrooms/onions and get the teriyaki sauce ready (use store brand or make your own – teriyaki mushrooms over rice recipe)
  5. put two frying pans on the stove, turn on the heat and then cook salmon in one pan and teriyaki mushrooms/onions in the other.
  6. when the two hot dishes (salmon, mushrooms) are done, now it’s time to yell “Dinner is ready!!” then  plate the rice, mushrooms, salmon and then quickly toss the salad and plate it.

Enjoy!

Pan-fried Salmon

Easy pan fried Salmon

  • 7 oz good fresh salmon (per serving)
  • salt and pepper (Lemon Pepper is also good)
  • 1 tsp of olive oil

Some grocery stores sell salmon in 70z pieces as one serving.  Or you may end up buying a bigger fillet if you have more people to feed. Just make sure the salmon is cut into smaller pieces to ensure it’s cooked all the way.

My tips on salmon –  Overcooking salmon is the most common mistake that even some restaurants make.  I think the best way to eat salmon is to have a crispy crust on the outside and have it moist and flaky in the inside. Salmon gets mushy and pasty if you overcook it. So always err on the side of cooking less than more.  Just like steak, salmon will cook a little more on its own even after you take it off the heat.

Seasoned salmon picture
Salmon seasoned with lemon pepper

Warm a large nonstick skillet on medium-high heat. Place the salmon in the pan with the skin-side up. Cook until golden brown on one  side, about 4 minutes. Turn the salmon over  and cook until it feels firm to the touch and the skin is crisp about 3 minutes more.

See picture of cooked salmon on my  salmon dinner post.

Teriyaki Mushrooms with Rice

Teriyaki Mushrooms and Onions

Teriyaki Mushrooms with Rice can be a great side dish to any Asian meal. This is really simple and quick to make if you have any store bought teriyaki sauce on hand.

Mushrooms and onions cut up Ingredients

  • 1 Onion (sliced)
  • 1 C sliced white mushrooms
  • 1 T Olive oil
  • 2 T Teriyaki Sauce
  • 1 T Water
  1. Heat the olive oil in a skillet on medium high heat.
  2. Stir in the onions and mushrooms and cook until the onions becomes translucent in color and the mushrooms become tender. (approx 4 min)
  3. Turn down the heat to low and add the teriyaki sauce to the skillet and let it simmer for another 2 min or so until it thickens.
  4. Pour the mushroom/onion mixture over cooked white rice.

You may want to serve this teriyaki mushroom rice with grilled salmon and caper salad.

Caper Salad

Ingredients

  • 1/2 head of lettuce (green leaf and/or iceberg)
  • 2 C baby greens [radicchio, arugula]
  • 6-7 escarole leaves (optional)
  • 1/4 red onion

Dressing

  • 1 Tbs oriental yellow mustard (kyuh-ja) [ paste made from dried mustard powder]
  • 3 Tbs rice vinegar or plain distilled vinegar
  • 3 Tbs sugar [ 2 T for less sweetness]
  • 1 tsp salt
  • 2 tsp capers
  • 1/2 tsp horseradish
  1. Wash all greens and tear up the big leaves of lettuce or escarole into bite size pieces
  2. Thinly slice the red onion and set aside
  3. Follow directions on the package of an oriental yellow mustard to make a syrupy mustard paste. Because the spiciness of mustard is different for different brands, you may need to adjust the amount to your taste. Start by adding 2 tsp of mustard and taste then add more if it’s not too spicy.
  4. Make the dressing by mixing mustard, vinegar, sugar and salt. Add horseradish and capers and mix again.

    Mustard Caper Dressing
    Mustard Caper Dressing
  5. In a salad bowl, mix the greens,  and the onions. Toss the salad with the dressing.

Variations/comments

  • Because the baby greens are very soft, be sure to pour the dressing right before you eat. If you mix it too early, the baby greens will become soggy and lose it’s crispness.
  • Dressing can be made in advance and in larger amounts since it keeps well in the refrigerator for weeks.
  • Oriental yellow mustard also comes in ready to use tube form. They are less flavorful and less spicy so you may need to use more. Mustard oil is another option to use but is usually very strong so please use little amounts.
  • This salad can also be made into meal salad by adding 1/2 lb of smoked salmon slices.  See Grilled Salmon – caper salad – Teriyaki Mushroom rice dinner.